Vertical Photo Panels Effect In Photoshop
Here's the image I'll be using for this tutorial:

The original image.
And here's what the final "vertical photo panels" effect will look like:

And here's what the final "vertical photo panels" effect will look like:

The Final Result
Let's get started!
Step 1: Add A White Solid Color Fill Layer
With your image newly opened in Photoshop, click on the New Fill or Adjustment Layer icon at the bottom of the Layers panel. It's the icon that looks like a circle split diagonally between black and white:

Click on the New Fill or Adjustment Layer icon.
Select Solid Color from the top of the list of fill and adjustment layers that appears:

Choose a Solid Color fill layer from the top of the list.
Photoshop will pop open the Color Picker so we can select which color we want to fill the layer with. Choose white, either by clicking in the top left corner of the large color selection box on the left or by entering 255 for the R, G and B options near the bottom center of the dialog box:

Choose white from the Color Picker.
Click OK when you're done to close out of the Color Picker. The document will now be filled with solid white, which will serve as the background for our effect:

The document is now filled with white.
If we look in the Layers panel, we see the new Solid Color fill layer, which Photoshop has named Color Fill 1, sitting above the original image on the Background layer:
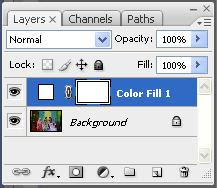
Photoshop places the Solid Color fill layer above the Background layer.
Step 2: Duplicate The Background Layer
Select the Background layer by clicking on it in the Layers panel:

Click on the Background layer to select it. Selected layers are highlighted in blue.
With the Background layer selected, go up to the Layer menu in the Menu Bar along the top of the screen, choose New, then choose Layer via Copy. Or, for a faster way to access the same command, press Ctrl+J (Win) / Command+J (Mac) on your keyboard:

Go to Layer -> New > Layer via Copy.
A copy of the Background layer, appropriately named Background copy, is added directly above the original:

The Background copy layer is added between the original Background layer and the Solid Color fill layer.
Step 3: Move The Background Copy Layer Above The Solid Color Fill Layer
We need to move the Background copy layer above the Solid Color fill layer, and the fastest and easiest way to do that is with a keyboard shortcut. Press Ctrl+right bracket ( ] ) (Win) / Command+right bracket ( ] ) (Mac) on your keyboard. This will jump the currently selected layer (the Background copy layer) up over the layer directly above it (the Color Fill 1 layer), placing the Background copy layer at the top of the layer stack:

Press Ctrl+] (Win) / Command+] (Mac) to jump the Background copy layer above the Solid Color fill layer.
Step 4: Select The Rectangle Tool
Select the Rectangle Tool from the Tools panel:

Select the Rectangle Tool.
Step 5: Select The Shapes Option
With the Rectangle Tool selected, click on the Shapes option in the Options Bar along the top of the screen. It's the left icon in a row of three icons near the far left of the Options Bar:

Select the Shapes option in the Options Bar.
Step 6: Draw The First Vertical Panel
With the Rectangle Tool in hand and the Shapes option selected, click inside the document and drag out your first vertical panel. We're going to add our panels from left to right across the image, so draw this first panel on the far left of the area you want to display. For example, in my case, I'm going to drag out my first panel on the left side of the man's face (don't worry about the color of the panel):

Dragging out the first panel on the left side of the image.
Step 7: Rotate The Panel Slightly With Free Transform
To add a bit more visual interest to the effect, let's rotate some of the panels so they don't all appear straight up and down. PressCtrl+T (Win) / Command+T (Mac) to quickly access Photoshop's Free Transform command, which places the Free Transform bounding box and handles around the panel. Click anywhere outside the panel and, with your mouse button still held down, drag with your mouse to rotate it. Don't rotate it too far - a slight angle is all we need. You can also move the panel to reposition it if you need to by clicking anywhere inside of it and, again with your mouse button still held down, dragging the panel around with your mouse. Here, I'm rotating the panel slightly counterclockwise. When you're done, press Enter (Win) / Return (Mac) on your keyboard to accept the change and exit out of the Free Transform command::

Use Free Transform to rotate and/or move the panel inside the document
Step 8: Move The Shape Layer Below The Background Copy Layer
If we look in the Layers panel, we see our newly added Shape layer (named Shape 1) sitting above the Background copy layer:

The Shape layer currently sits at the top of the layer stack.
We need to swap the order of the two layers so the Shape layer appears below the Background copy layer, and we can do that with another handy keyboard shortcut. With the Shape layer selected, press Ctrl+left bracket ( [ ) (Win) / Command+left bracket ( [ ) (Mac) on your keyboard. This jumps the currently selected layer (the Shape 1 layer) down below the layer directly below it (the Background copy layer):

Press Ctrl+[ (Win) / Command+[ (Mac) to move the Shape 1 layer below the Background copy layer.
Step 9: Select The Background Copy Layer
Once again click on the Background copy layer to select it:

Click on the Background copy layer at the top of the layer stack to select it.
Step 10: Create A Clipping Mask
Go up to the Layer menu at the top of the screen and choose Create Clipping Mask:

Go to Layer > Create Clipping Mask.
This "clips" the image on the Background copy layer to the vertical panel on the Shape layer directly below it, hiding everything on the Background copy layer except for the area that sits directly above the panel:
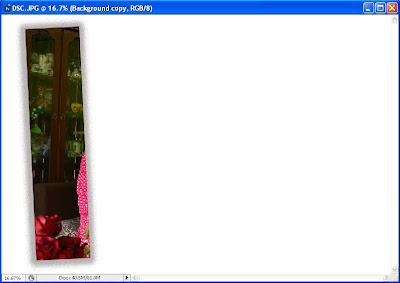
(Sepatutnye stap ni belum ad shadow ok, u all akan lihat hasil anda sndiri)
Only the part of the image that appears over the panel shape remains visible in the document.
If we look in the Layers panel, we see that the Background copy layer is now indented to the right, with a small arrow pointing downward to the left of the preview thumbnail. This is Photoshop's way of telling us that the layer is clipped to the contents of the layer below it:

Hold Shift and click on the Background copy layer to select it and the Shape 1 layer.


Name the new layer group "Panel".
Photoshop places the two layers inside a new layer group named Panel. Only the group itself is currently visible in the Layers panel. The two layers are hidden inside the group. We're going to add our additional photo panels to the document by making copies of the group:
 The two layers are now inside a layer group named Panel.
Step 15: Duplicate The Layer Group
Click on the Panel group and, with your mouse button held down, drag it down onto the New Layer icon at the bottom of the Layers panel:
 Click and drag the Panel group down onto the New Layer icon.
Release your mouse button over the New Layer icon. Photoshop creates a copy of the group, names it Panel copy, and places it above the original Panel group:
 A copy of the Panel group is added above the original.
Step 16: Move The Copy Below The Original Group
Press Ctrl+left bracket ( [ ) (Win) / Command+left bracket ( [ ) (Mac) to move the copy of the Panel group below the original:

Step 17: Open The Layer Group
Click on the small triangle icon to the left of the Panel copy group's name. This will twirl the group open, revealing the two layers inside it:

Let's get started!
Step 1: Add A White Solid Color Fill Layer
With your image newly opened in Photoshop, click on the New Fill or Adjustment Layer icon at the bottom of the Layers panel. It's the icon that looks like a circle split diagonally between black and white:

Click on the New Fill or Adjustment Layer icon.
Select Solid Color from the top of the list of fill and adjustment layers that appears:

Choose a Solid Color fill layer from the top of the list.
Photoshop will pop open the Color Picker so we can select which color we want to fill the layer with. Choose white, either by clicking in the top left corner of the large color selection box on the left or by entering 255 for the R, G and B options near the bottom center of the dialog box:

Choose white from the Color Picker.
Click OK when you're done to close out of the Color Picker. The document will now be filled with solid white, which will serve as the background for our effect:

The document is now filled with white.
If we look in the Layers panel, we see the new Solid Color fill layer, which Photoshop has named Color Fill 1, sitting above the original image on the Background layer:

Photoshop places the Solid Color fill layer above the Background layer.
Step 2: Duplicate The Background Layer
Select the Background layer by clicking on it in the Layers panel:

Click on the Background layer to select it. Selected layers are highlighted in blue.
With the Background layer selected, go up to the Layer menu in the Menu Bar along the top of the screen, choose New, then choose Layer via Copy. Or, for a faster way to access the same command, press Ctrl+J (Win) / Command+J (Mac) on your keyboard:

Go to Layer -> New > Layer via Copy.
A copy of the Background layer, appropriately named Background copy, is added directly above the original:

The Background copy layer is added between the original Background layer and the Solid Color fill layer.
Step 3: Move The Background Copy Layer Above The Solid Color Fill Layer
We need to move the Background copy layer above the Solid Color fill layer, and the fastest and easiest way to do that is with a keyboard shortcut. Press Ctrl+right bracket ( ] ) (Win) / Command+right bracket ( ] ) (Mac) on your keyboard. This will jump the currently selected layer (the Background copy layer) up over the layer directly above it (the Color Fill 1 layer), placing the Background copy layer at the top of the layer stack:

Press Ctrl+] (Win) / Command+] (Mac) to jump the Background copy layer above the Solid Color fill layer.
Step 4: Select The Rectangle Tool
Select the Rectangle Tool from the Tools panel:

Select the Rectangle Tool.
Step 5: Select The Shapes Option
With the Rectangle Tool selected, click on the Shapes option in the Options Bar along the top of the screen. It's the left icon in a row of three icons near the far left of the Options Bar:

Select the Shapes option in the Options Bar.
Step 6: Draw The First Vertical Panel
With the Rectangle Tool in hand and the Shapes option selected, click inside the document and drag out your first vertical panel. We're going to add our panels from left to right across the image, so draw this first panel on the far left of the area you want to display. For example, in my case, I'm going to drag out my first panel on the left side of the man's face (don't worry about the color of the panel):

Dragging out the first panel on the left side of the image.
Step 7: Rotate The Panel Slightly With Free Transform
To add a bit more visual interest to the effect, let's rotate some of the panels so they don't all appear straight up and down. PressCtrl+T (Win) / Command+T (Mac) to quickly access Photoshop's Free Transform command, which places the Free Transform bounding box and handles around the panel. Click anywhere outside the panel and, with your mouse button still held down, drag with your mouse to rotate it. Don't rotate it too far - a slight angle is all we need. You can also move the panel to reposition it if you need to by clicking anywhere inside of it and, again with your mouse button still held down, dragging the panel around with your mouse. Here, I'm rotating the panel slightly counterclockwise. When you're done, press Enter (Win) / Return (Mac) on your keyboard to accept the change and exit out of the Free Transform command::

Use Free Transform to rotate and/or move the panel inside the document
Step 8: Move The Shape Layer Below The Background Copy Layer
If we look in the Layers panel, we see our newly added Shape layer (named Shape 1) sitting above the Background copy layer:

The Shape layer currently sits at the top of the layer stack.
We need to swap the order of the two layers so the Shape layer appears below the Background copy layer, and we can do that with another handy keyboard shortcut. With the Shape layer selected, press Ctrl+left bracket ( [ ) (Win) / Command+left bracket ( [ ) (Mac) on your keyboard. This jumps the currently selected layer (the Shape 1 layer) down below the layer directly below it (the Background copy layer):

Press Ctrl+[ (Win) / Command+[ (Mac) to move the Shape 1 layer below the Background copy layer.
Step 9: Select The Background Copy Layer
Once again click on the Background copy layer to select it:

Click on the Background copy layer at the top of the layer stack to select it.
Step 10: Create A Clipping Mask
Go up to the Layer menu at the top of the screen and choose Create Clipping Mask:

Go to Layer > Create Clipping Mask.
This "clips" the image on the Background copy layer to the vertical panel on the Shape layer directly below it, hiding everything on the Background copy layer except for the area that sits directly above the panel:

(Sepatutnye stap ni belum ad shadow ok, u all akan lihat hasil anda sndiri)
Only the part of the image that appears over the panel shape remains visible in the document.
If we look in the Layers panel, we see that the Background copy layer is now indented to the right, with a small arrow pointing downward to the left of the preview thumbnail. This is Photoshop's way of telling us that the layer is clipped to the contents of the layer below it:

Step 11: Add A Drop Shadow
Let's add a couple of simple layer styles to the panel. First, click on the Shape 1 layer to select it
Then click on the Layer Styles icon at the bottom of the Layers panel:

Click on the Shape 1 layer in the Layers panel to select it. Click on the Layer Styles icon.
Choose Drop Shadow from the list of layer styles that appears:

Choose Drop Shadow from the list.
This opens Photoshop's Layer Style dialog box set to the Drop Shadow options in the middle column. Lower the Opacity of the shadow down to 60% to reduce its intensity, then set the Angle to 120°. Set both the Distance and Size options to 10 px, although you may want to experiment with different values for these two options depending on the size of the image you're working with:

The Drop Shadow options.
Leave the Layer Style dialog box open for the moment because we still have one more layer style to add. Your panel should look similar to this after adding the drop shadow:

Tapi, U all will get different shadow with me (setting shadow ikut kesukaan anda ye..)
The image after adding a drop shadow to the first panel.
Step 12: Add A Stroke
With the Layer Style dialog box still open, click directly on the word Stroke at the bottom of the list along the left of the dialog box. Make sure you click on the word itself, not just in the checkbox, otherwise you won't have access to the Stroke options:

Click directly on the word Stroke on the left of the Layer Style dialog box.
The middle column of the Layer Style dialog box will change to show options for the stroke. Click on the color swatch to the right of the word Color to change the color of the stroke:

Click on the color swatch.
Photoshop will open the Color Picker once again, this time so we can select a new color for the stroke that will appear around the edges of the panel. Choose white just as we did back in Step 1, either by clicking in the top left corner of the large color selection box on the left or by entering 255 for the R, G and B values. When you're done, click OK to close out of the Color Picker:

Choose white from the Color Picker.
Finally, change the Size of the stroke to 2 px (you may want to use a larger value if you're working with a larger image), then change the Position to Inside, which will keep the stroke nice and sharp in the corners of the panel:

Set the Size to 2 px and the Position to Inside.
Click OK to close out of the Layer Style dialog box. Your panel should now look similar to this after adding the drop shadow and the stroke:

The first panel after applying a drop shadow and a white stroke.
Step 13: Select Both Layers At Once
With the Shape 1 layer already selected, hold down your Shift key and click on the Background copy layer above it. This will select both layers at once (both will appear highlighted in blue):
Let's add a couple of simple layer styles to the panel. First, click on the Shape 1 layer to select it
Then click on the Layer Styles icon at the bottom of the Layers panel:

Click on the Shape 1 layer in the Layers panel to select it. Click on the Layer Styles icon.
Choose Drop Shadow from the list of layer styles that appears:

Choose Drop Shadow from the list.
This opens Photoshop's Layer Style dialog box set to the Drop Shadow options in the middle column. Lower the Opacity of the shadow down to 60% to reduce its intensity, then set the Angle to 120°. Set both the Distance and Size options to 10 px, although you may want to experiment with different values for these two options depending on the size of the image you're working with:

The Drop Shadow options.
Leave the Layer Style dialog box open for the moment because we still have one more layer style to add. Your panel should look similar to this after adding the drop shadow:

Tapi, U all will get different shadow with me (setting shadow ikut kesukaan anda ye..)
The image after adding a drop shadow to the first panel.
Step 12: Add A Stroke
With the Layer Style dialog box still open, click directly on the word Stroke at the bottom of the list along the left of the dialog box. Make sure you click on the word itself, not just in the checkbox, otherwise you won't have access to the Stroke options:

Click directly on the word Stroke on the left of the Layer Style dialog box.
The middle column of the Layer Style dialog box will change to show options for the stroke. Click on the color swatch to the right of the word Color to change the color of the stroke:

Click on the color swatch.
Photoshop will open the Color Picker once again, this time so we can select a new color for the stroke that will appear around the edges of the panel. Choose white just as we did back in Step 1, either by clicking in the top left corner of the large color selection box on the left or by entering 255 for the R, G and B values. When you're done, click OK to close out of the Color Picker:

Choose white from the Color Picker.
Finally, change the Size of the stroke to 2 px (you may want to use a larger value if you're working with a larger image), then change the Position to Inside, which will keep the stroke nice and sharp in the corners of the panel:

Set the Size to 2 px and the Position to Inside.
Click OK to close out of the Layer Style dialog box. Your panel should now look similar to this after adding the drop shadow and the stroke:

The first panel after applying a drop shadow and a white stroke.
Step 13: Select Both Layers At Once
With the Shape 1 layer already selected, hold down your Shift key and click on the Background copy layer above it. This will select both layers at once (both will appear highlighted in blue):
Step 14: Create A Layer Group
With both layers now selected, go up to the Layer menu at the top of the screen, choose New, then choose Group from Layers:
With both layers now selected, go up to the Layer menu at the top of the screen, choose New, then choose Group from Layers:

Go to Layer > New > Group from Layers.
Photoshop will open the New Group from Layers dialog box. Name the new layer group Panel, then click OK to close out of the dialog box:
Photoshop will open the New Group from Layers dialog box. Name the new layer group Panel, then click OK to close out of the dialog box:

Name the new layer group "Panel".
Photoshop places the two layers inside a new layer group named Panel. Only the group itself is currently visible in the Layers panel. The two layers are hidden inside the group. We're going to add our additional photo panels to the document by making copies of the group:
 The two layers are now inside a layer group named Panel.
Step 15: Duplicate The Layer Group
Click on the Panel group and, with your mouse button held down, drag it down onto the New Layer icon at the bottom of the Layers panel:
 Click and drag the Panel group down onto the New Layer icon.
Release your mouse button over the New Layer icon. Photoshop creates a copy of the group, names it Panel copy, and places it above the original Panel group:
 A copy of the Panel group is added above the original.
Step 16: Move The Copy Below The Original Group
Press Ctrl+left bracket ( [ ) (Win) / Command+left bracket ( [ ) (Mac) to move the copy of the Panel group below the original:

Press Ctrl+[ (Win) / Command+[ (Mac) to move the Panel copy group below the original.
Step 17: Open The Layer Group
Click on the small triangle icon to the left of the Panel copy group's name. This will twirl the group open, revealing the two layers inside it:

Click on the triangle to twirl open the Panel copy group.
Step 18: Select The Shape Layer
Click on the Shape 1 layer inside the group to select it:
Select the Shape 1 layer inside the Panel copy group.
Step 19: Move And Rotate The Shape With Free Transform
Press Ctrl+T (Win) / Command+T (Mac) to quickly bring up the Free Transform handles around the second panel, then click anywhere inside the panel and drag it towards the right. It will look at first like there's only one panel in the document since the original panel is sitting directly above the second, but as soon as you begin dragging towards the right, you'll see the second panel emerge from behind the original. As you drag the second panel into position, more of the image is revealed inside of it:
Try to place the second panel either slightly higher or lower than the original panel, again just to add more visual interest. Also, rotate the panel in the opposite direction by clicking anywhere outside of it and dragging with your mouse. Here, I've positioned my second panel a bit higher than the first and I've rotated it clockwise. When you're done, press Enter (Win) / Return (Mac) to accept the change and exit out of the Free Transform command:
Step 20: Close The Layer Group
We need to make a few more copies of the layer group to create the additional panels, so to prevent things from getting too cluttered and confusing in the Layers panel, close the layer group when you're done with it by clicking again on the triangle to the left of the group's name:
 Close the layer group when you're done to keep things looking clean and organized.
Step 21: Repeat Steps 15-20 To Add The Additional Panels
At this point, adding the remaining panels is just a matter of repeating the same few steps. First, duplicate the previously added layer group (it will be the bottom-most group in the Layers panel and will also be the one highlighted in blue) by dragging it down onto theNew Layer icon:

A copy of the group will appear directly above it. Here, the new copy is named Panel copy 2. As you add more panels, the layer groups will be named Panel copy 3, Panel copy 4, and so on:


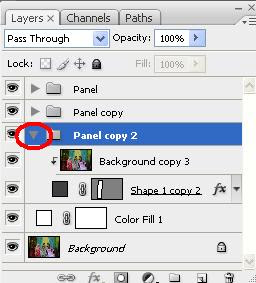

Use Free Transform to move and rotate the panel.
Step 18: Select The Shape Layer
Click on the Shape 1 layer inside the group to select it:
Step 19: Move And Rotate The Shape With Free Transform
Press Ctrl+T (Win) / Command+T (Mac) to quickly bring up the Free Transform handles around the second panel, then click anywhere inside the panel and drag it towards the right. It will look at first like there's only one panel in the document since the original panel is sitting directly above the second, but as soon as you begin dragging towards the right, you'll see the second panel emerge from behind the original. As you drag the second panel into position, more of the image is revealed inside of it:
Click inside the panel and drag it towards the right to reveal more of the image.
Try to place the second panel either slightly higher or lower than the original panel, again just to add more visual interest. Also, rotate the panel in the opposite direction by clicking anywhere outside of it and dragging with your mouse. Here, I've positioned my second panel a bit higher than the first and I've rotated it clockwise. When you're done, press Enter (Win) / Return (Mac) to accept the change and exit out of the Free Transform command:
Step 20: Close The Layer Group
We need to make a few more copies of the layer group to create the additional panels, so to prevent things from getting too cluttered and confusing in the Layers panel, close the layer group when you're done with it by clicking again on the triangle to the left of the group's name:
 Close the layer group when you're done to keep things looking clean and organized.
At this point, adding the remaining panels is just a matter of repeating the same few steps. First, duplicate the previously added layer group (it will be the bottom-most group in the Layers panel and will also be the one highlighted in blue) by dragging it down onto theNew Layer icon:

Drag the bottom-most layer group down onto the New Layer icon.
A copy of the group will appear directly above it. Here, the new copy is named Panel copy 2. As you add more panels, the layer groups will be named Panel copy 3, Panel copy 4, and so on:

Photoshop adds the copy of the layer group directly above the original.
Press Ctrl+left bracket ( [ ) (Win) / Command+left bracket ( [ ) (Mac) on your keyboard to move the new group below the other layer groups:
Press Ctrl+left bracket ( [ ) (Win) / Command+left bracket ( [ ) (Mac) on your keyboard to move the new group below the other layer groups:

Press Ctrl+[ (Win) / Command+[ (Mac) to move the new copy below its original.
Open the layer group by clicking on the triangle icon to the left of its name, then select the Shape 1 layer inside the group:
Open the layer group by clicking on the triangle icon to the left of its name, then select the Shape 1 layer inside the group:

Open the layer group and select the Shape 1 layer.
Press Ctrl+T (Win) / Command+T (Mac) to bring up the Free Transform box and handles around the new panel, then click inside the panel and drag it towards the right to reveal more of the image, placing the new panel slightly above or below the previous one. Click outside the panel and drag with your mouse to rotate it. Press Enter (Win) / Return (Mac) when you're done to exit out of Free Transform:
Press Ctrl+T (Win) / Command+T (Mac) to bring up the Free Transform box and handles around the new panel, then click inside the panel and drag it towards the right to reveal more of the image, placing the new panel slightly above or below the previous one. Click outside the panel and drag with your mouse to rotate it. Press Enter (Win) / Return (Mac) when you're done to exit out of Free Transform:

Use Free Transform to move and rotate the panel.
Finally, click on the triangle icon to close the layer group when you're done. You don't necessarily have to close the layer groups each time, but it's much easier to work inside the Layers panel with the groups closed:
Click on the triangle to close the group when you're done.
Repeat these same steps to add your remaining panels to the document, and you're done! Here, after adding three more panels to reveal the rest of the man's face, is my final "vertical photo panels" result (I've cropped away some of the white background with the Crop Tool):


0 comments:
Post a Comment